


Quick view Trendy Pink-Tinted SunglassesStep up your style game with these fashionable black-framed, pink-tinted sunglasses. Perfect for making a statement while protecting your eyes from the glare. Their bold color and contemporary design make these shades a must-have accessory for any trendsetter looking to add a pop of color to their ensemble.Vendor: Demo$1.00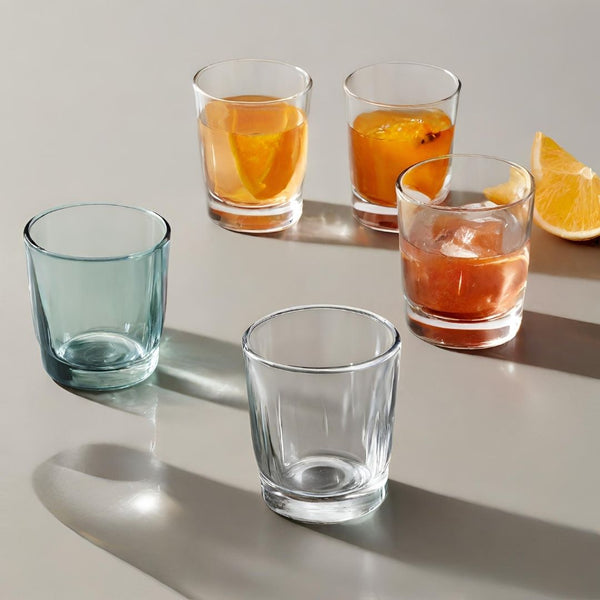
Quick view Elegant Glass Tumbler SetEnhance your drinkware collection with our sophisticated set of glass tumblers, perfect for serving your favorite beverages. This versatile set includes both clear and subtly tinted glasses, lending a modern touch to any table setting. Crafted with quality materials, these durable tumblers are designed to withstand daily use while maintaining their elegant appeal.Vendor: Demo$1.00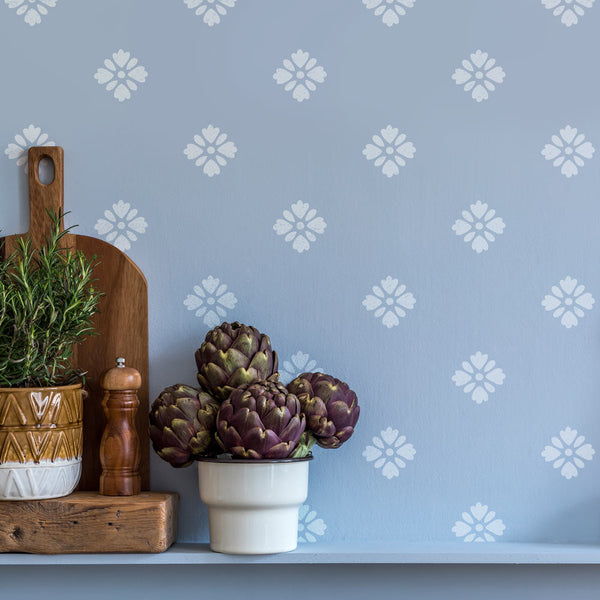
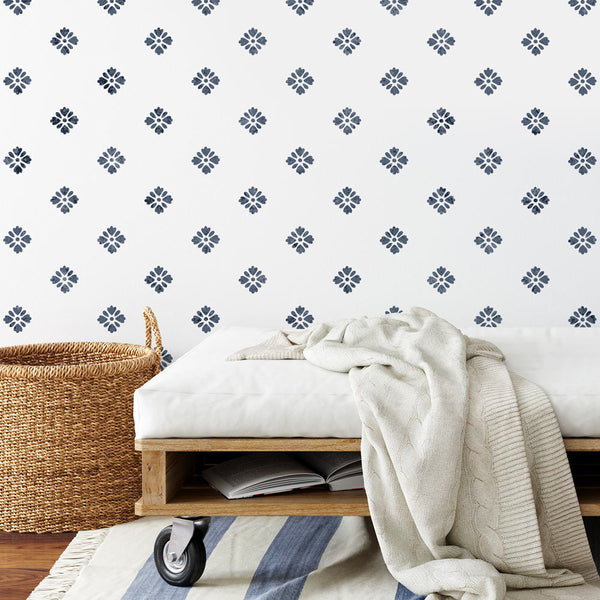
Quick view Cornflower Wall StencilWe admire elegant simplicity of our Cornflower stencil! This cottage stencil pattern looks fabulous painted on bedroom walls, hallways, or in the kitchen. Perfect stencil choice for the cottage core decor. This stencil is very easy for beginners! Give stenciling a try and save a lot on your next DIY room remodel. You can easily create stunning home decor with our Cornflower Wall Stencil. This cottage-inspired stencil pattern brings a touch of nature to your walls. Enhance any room with ease and transform your space on a budget. We've even included a FREE single cornflower stencil, just to help you to get into the tighter places around moldings, light switches, tight corners etc. For alignment please refer to the step-by-step pics. Stencil aligns easily vertically and horizontally for a seamless wallpaper effect by slightly overlapping and locking in with previously painted parts. No need to wait for the paint to dry between repeats, if you're stenciling with flat paint over flat background (which we always recommend), the paint dries very quickly between repeats and no smudging should occur.Most of our stencils do not require the use of spray adhesive, however using it will produce better results. If you want to minimize paint seepage or are using high contrasting colors, spray adhesive is very helpful. Make sure you shake the can well and lightly mist (not drench) the stencil, and let it dry for a moment before positioning it on the wall. This step will prevent the adhesive residue transferring to the wall. You'll need to re-mist the stencil after a few repeats. Note: you will still need to hold the stencil in place with a few pieces of blue painters tape! Adhesive by itself is not enough to hold the stencil on the wall. Clean-up tip: Spray the stencil with Simple Green to help to remove adhesive residue. Stenciling on rough or textured walls may contribute to increased paint bleed. For more information on stenciling on textured walls, see our F.A.Q. section.Want to learn how to use an interlocking allover stencil pattern? Easier than you think! Here are the detailed illustrated step-by-step Damask/Allover Stenciling Tips.Our Blog "Stencil Stories" is packed full of illustrated tutorials and inspiration! Please check it out to get some stencil ideas and learn new stenciling techniques! We post new decorating ideas daily!And make sure you watch our short step-by-step Video Tutorials!You'll find them extremely helpful for your stenciling project. While prior experience is helpful when working with repeat interlocking stencils, even beginners get great results!We recommend using any alover stencil with our Clip-on Stencil Level, (sold separately). Discover how easy it is to achieve perfectly level results without dealing with all those bulky heavy bubble levels and expensive laser levels. We cannot recommend the Level enough, it's a real time-saver and is so handy!The stencil is made out of durable 10 mil mylar plastic stencil material. This material is strong but flexible, reusable and easy to clean. It's not brittle, user friendly and just so easy to work with. In our many years of professional stenciling this material has proven to be far superior in quality to any other stencil material we used. Our customers love it too, and we are sure that you'll notice the difference! Our stencils will last a long time and are a pleasure to use.Vendor: Cutting Edge Stencils$1.00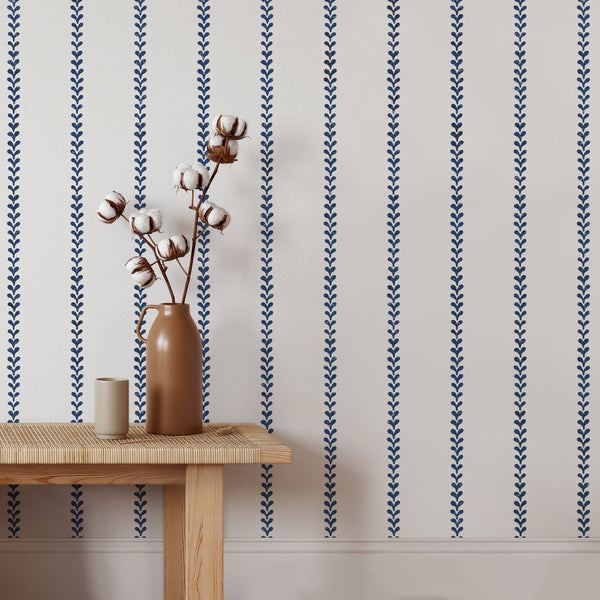
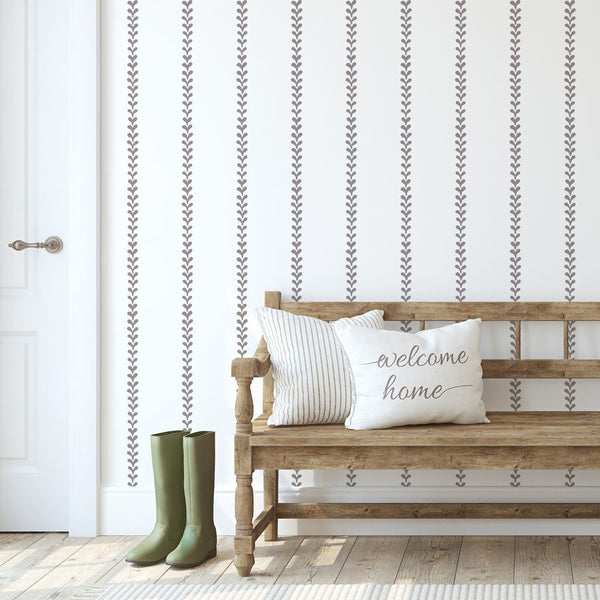
Quick view Country Cottage Stripe StencilAdd a touch of country charm to your home with our Country Cottage Stripe Stencil. Create a nostalgic and cozy atmosphere with this practical and budget-friendly alternative to wallpaper. Perfect for DIY room decor, this stencil is a must-have for anyone looking to add a charming cottage vibe to their space. Wall Stencils are in many ways better than expensive wallpaper! Stencils are reusable and let you use any color you want to perfectly match your decor. Stencil features an easy registration system, just use parts of the previously painted design to align the stencil, check for level and continue. This gives you a seamless "wallpaper" look. Don't worry about super perfect alignment: in the end your eye will never ever notice the discrepancy. This Cottage Stripe stencil comes with an additional FREE Top edge stencil: the upper part of the design cut as a smaller separate stencil. It makes it easy to fill the gaps close to the ceiling line. To see how to use Top edge stencils, click here for Illustrated instructions: Using Top Edge Stencils While prior stenciling experience is a plus for allover stencil patterns, even beginners get great results! Try this stencil with our Clip-On Stencil Level, (sold separately) and discover how easy it is to achieve perfectly level results without dealing with all those bulky heavy bubble levels or laser levels.Want to learn how to stencil a damask or allover pattern? Here are the detailed illustrated step-by-step Damask/Allover Stenciling Tips.And make sure you watch our short step-by-step Video Tutorials! You'll find them extremely helpful for your stenciling project. Although our stencils do not require the use of spray adhesive, this stencil could benefit from it to help minimize paint seepage, especially if your walls have a slight texture to them. Make sure you shake the can well and lightly mist (not drench) the stencil, and let it dry for a moment before positioning it on the wall. This step will prevent the adhesive residue transferring to the wall. You'll need to re-mist the stencil after a few repeats. Note: you will still need to hold the stencil in place with a few pieces of blue painters tape! Adhesive by itself is not enough to hold the stencil on the wall. Clean-up tip: Spray the stencil with Simple Green to help to remove adhesive residue. Please note that once you've used spray adhesive on your stencil, it will never really come off completely. That is why we personally prefer not to use adhesive, and instead use less paint on your roller or stencil brush. About seepage and imperfections: Even with a proper loaded roller and correct technique you might get some minor paint seepage here and there. In most cases it's not noticeable, especially from a couple of feet away and it can be easily touched up with a small brush. Don't forget that you're creating a "hand-painted wall finish". A few imperfections and some paint seepage here and there are natural and inevitable for this type of work. To avoid seepage, use spray adhesive and less paint on your roller and brush.Did you know you can stencil your own fabric and use it for curtains, tablecloths, pillows, etc.? When stenciling on fabric, please use stencil adhesive to ensure good results. First, tape your ironed fabric to the surface so it doesn't move around while you stencil. You'll get better results with stencil brushes, but sometimes roller can work too, depending on your fabric. Add some textile medium ( sold in craft stores) to your acrylic paint. You can also get a specially formulated fabric paint, but, frankly, good craft acrylic paint with a dollop of textile medium mixed in works just as well, and costs way less! :) Let the stenciled image dry completely, 24 hours is best, then heat-set it by ironing the fabric for about 20-30 seconds on a LOW setting through the piece of cloth. Heat-setting will cure the paint and will prevent it from being washed off in the washing machine. Always experiment with a sample of your fabric first to ensure good results. We have stenciled on silk, cotton, linen and even sheer fabrics with great results. It's always better if your fabric doesn't have too much texture.Our stencils are made to last and with proper care and storage will serve you for long time.Vendor: Cutting Edge Stencils$1.00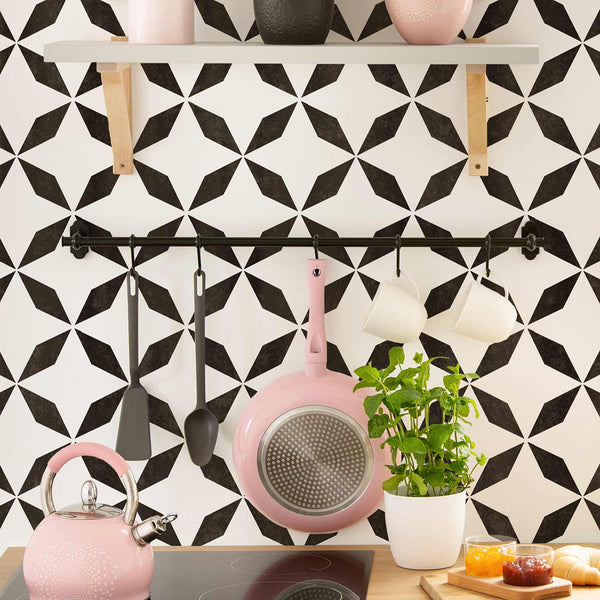
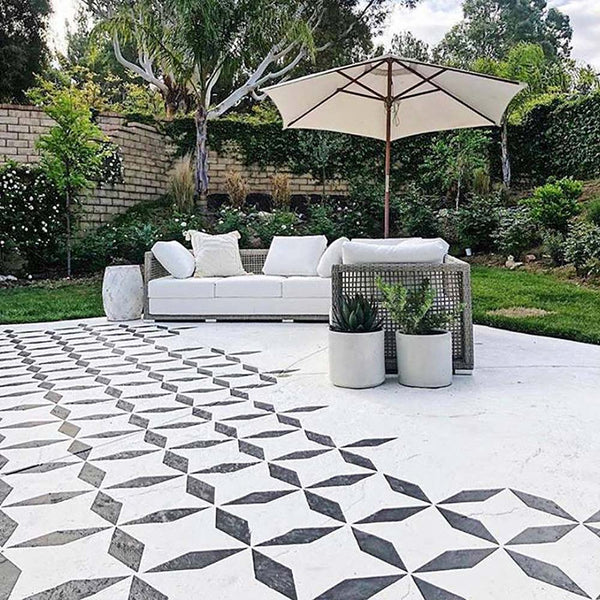
Quick view Diamant Tile Stencil Size SmallTake advantage of our overstock inventory! Save some cash and stock up! Supplies are limited and all sales are final. Our Diamant Tile stencil is inspired by a classic geometric encaustic cement tile design, which is both classy and timeless. This cement tile stencil is perfect for creating a gorgeous painted tile floor, kitchen tile backsplash, accent wall or even a faux tile table top! With our tile stencils, you can create a dramatic tile floor on a budget and save big on bath and kitchen renovations! No need to rip out your old tile, as you can stencil right over it. Just imagine the savings! How to measure your tile: The size of our tile stencil designs are exactly as advertised. We currently offer them in 4", 6", 8", 12", and 16". The grout line is NOT factored into those sizes. Before ordering, please measure your tile from tile edge to tile edge. Do NOT include the grout lines. If your tile is slightly larger/smaller than our listed dimensions, please contact customer service using Contact form. You can use this versatile tile stencil in two ways: with the smaller "diamond" and without it! If you like to omit the smaller diamond from the stencil pattern, simply mask it out with pieces of blue painter's tape. Our images we show both versions of the stenciled tile: with and without the extra diamond. About registration marks: you can use them to align your tile stencil repeats, or not! It really depends on what surface you're stenciling. When stenciling over an existing old tile, the registration marks might not be helpful as the grout width varies from floor to floor. In this case, simply mask out the registration marks with pieces of blue tape, and align the stencil by eye by centering it on each old tile. If you are stenciling over a wall, or linoleum/cement floor - please use registration marks for easy alighnment of your tile stencil. Please see our alignment pic for reference. Learn How to stencil a tile – it’s easy even for beginners! We recommend purchasing two tile stencils for your project. Not only it will go faster, but you'll be able to get into tighter places and corners by cutting your spare tile stencil. You can certainly bend your stencil and still get to all the tight spots, but you know what we're sayin' - having two stencils makes your life much easier! :) To stencil over existing old floor tiles, first thoroughly wash your floor, let it dry, then give it a coat of adhesive primer (Stix is best in our experience), after that apply a base coat color (regular wall latex paint will do). Then, stencil your floor in acrylic or latex paint and finally seal it with two coats of water-based polyurethane for durability. How durable your newly stenciled floor will be? Very durable! In our experience the stenciled finish will last for years. We hear the same positive feedback from our customers about their durable stenciled tile floors. Just make sure to use the proper primer! Use smaller tiles for the backsplashes and stenciled stairs. We also include a free Grout Line stencil to give your stenciled tiles that sharp, clean look! For expert stenciling tips, please watch our How-to stencil videos! You'll find them extremely helpful for your stenciling project. Even beginners get great results! Although most of our stencils do not require the use of spray adhesive, if your surface has a texture to it, it might be a good idea to use spray adhesive to help minimize paint seepage (Elmer's spray adhesive seems to be the best). Make sure you shake the can well and lightly mist (not drench) the stencil, and let it dry for a moment before positioning it on the surface you're about to stencil. This step will prevent the adhesive residue transferring to the wall. You'll need to re-mist the stencil after a few repeats. Note: you will still need to hold the stencil in place with a few pieces of blue painters tape! Adhesive by itself is not enough to hold the stencil on the wall. Clean-up tip: Spray the stencil with Simple Green to help to remove adhesive residue and let it sit for a while before cleaning with soap and water. Please note that it is virtually impossible to get rid of all adhesive residue. That's why we personally prefer not to use it and just stick with painter's tape! Stenciling on rough or textured surfaces may contribute to increased paint bleed. For more information on stenciling on textured walls, see our F.A.Q. section. About seepage and imperfections: Even with a proper loaded roller and correct technique you might get some minor paint seepage here and there. In most cases it's not noticeable, especially from a couple of feet away and it can be easily touched up with a small brush. Don't forget that you're creating a "hand-painted wall finish". A few imperfections and some paint seepage here and there are natural and inevitable for this type of work. To avoid seepage, use spray adhesive and less paint on your roller and brush. Our stencils are laser cut from 10 mil mylar to the highest industry standards and with proper care and storage will serve you for long time.Vendor: Cutting Edge Stencils$1.00 $1.00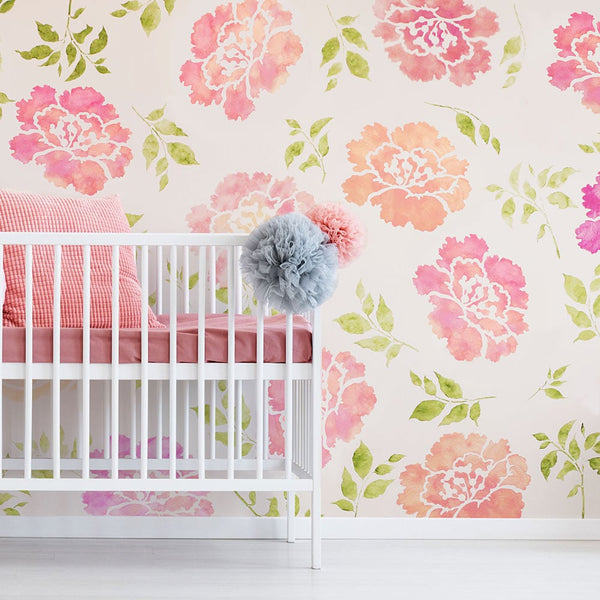
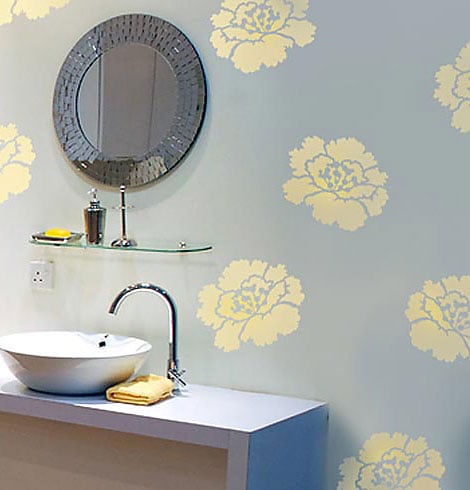
Quick view Peony Grande Flower Stencil Size Extra SmallTake advantage of our overstock inventory! Save some cash and stock up! Supplies are limited and all sales are final. This flower stencil Peony Grande creates quite a statement in a room! Try this dramatic floral stencil for your next DIY project. Super easy to use! Since it's a reusable sturdy stencil, and not a vinyl wall decal, you can reuse it many times and create your own cool paint color combos! If you love the look of trendy vinyl wall decals but dislike the idea of putting stickers on your walls, these silhouette wall art stencils are just what you've been looking for. Not only are they re-usable, but they give you the flexibility of using any color you want. You'll also get the satisfaction of knowing that you've created your own hand-painted sophisticated wall art instead of just applying a vinyl sticker.This large wall stencil makes a stunning accent on a wall above the sofa or table, or bed or pretty much any wall space. Trendy and hip, this bold and modern stencil will instantly turn an ordinary room into a special place. Perfect for DIY wall decor.We find that it is not necessary to use spray adhesive with our stencils. However, if you want very crisp edges or are using high contrasting colors, please use it (Elmer's spray adhesive seems to be the best). I personally prefer just to attach pieces of blue painter's tape to secure the stencil, but for beginners it may be helpful to mist a stencil with spray adhesive just to make sure you get great results.Want to learn the easiest stenciling technique? Here are the detailed illustrated Roller Stenciling Tips.Vendor: Cutting Edge Stencils$1.00 $1.00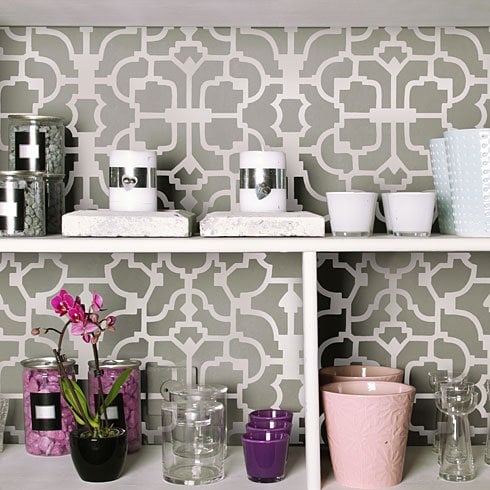
Quick view Vision Craft Stencil Size SmallTake advantage of our overstock inventory! Save some cash and stock up! Supplies are limited and all sales are final. Our craft size stencil Vision is perfectly sized for smaller DIY home decor projects where a wall stencil would be too large. These trendy craft stencils are great for creating your own designer stenciled pillows or curtains or transforming garage sale furniture finds into cool decorative pieces. It doesn't end there: try stenciling lamp shades, kitchen backsplashes, doors, table tops, picture and mirror frames, or create your own work of art on pre-stretched canvas. Decorative possibilities are endless with these versatile reusable craft stencils!Although usually it is not necessary to use spray adhesive with our stencils, adhesive can very helpful if you want to minimize paint seepage or are using high contrasting colors. (regular Elmer's spray adhesive seems to be the best). Make sure you shake the can well and lightly mist (not drench) the stencil, and let it dry for a moment before positioning it. This step will prevent the adhesive residue transferring to your surface. You'll need to re-mist the stencil after a few repeats. Clean-up tip: Spray the stencil with Simple Green to help to remove adhesive residue.When stenciling on fabric, stencil adhesive is very helpful. First, tape your ironed fabric to the surface so it doesn't move around while you stencil. Use stencil brushes, or dense foam roller, and add some textile medium (sold in craft stores) to your acrylic paint. You can also get a special fabric paint, but, frankly, good craft acrylics with a dollop of textile medium work just as well, and cost way less too! :) Textile medium is optional: it only makes the acrylic paint more flexible when it dries, which is important for wearables like t-shirts but not so much for pillows and curtains. Complete the stenciling and let it dry fully, 24 hours is best, then heat-set it by ironing the fabric for about 20 sec. ( more or less) on a LOW setting through the piece of cloth. Heat-setting will cure the paint and will prevent it from being washed off in the washing machine. Always experiment first stenciling on a sample of your fabric to ensure good results. I've stenciled on silk, cotton, linen and even sheer fabrics with great results. It's always better if your fabric doesn't have too much texture.When stenciling on furniture, you want to insure good adhesion. If the piece has a varnish or a glossy finish you'll need to break the sheen. You can do this with a scotch brite pad, steel wool or fine grit sandpaper. Lightly sand the surface and then wipe down the piece with a damp cloth or paper towel. Next, basecoat the piece if you want to change the overall color. Most acrylic and latex paints work well, but to insure good adhesion you may want to use an adhesive primer such as Stix or Zinnser 1*2*3. These primers can even be tinted to the color you want. After your primer/basecoat is dry you can start stenciling with whatever paint you like. FolkArt acrylics and Benjamin Moore paints work great. You can just tape your stencils with pieces of blue painters tape, or use spray adhesive for a crisper look. If you want to protect your artwork, you could then topcoat the table with a clear topcoat (spray or brush-on).Vendor: Cutting Edge Stencils$1.00 $1.00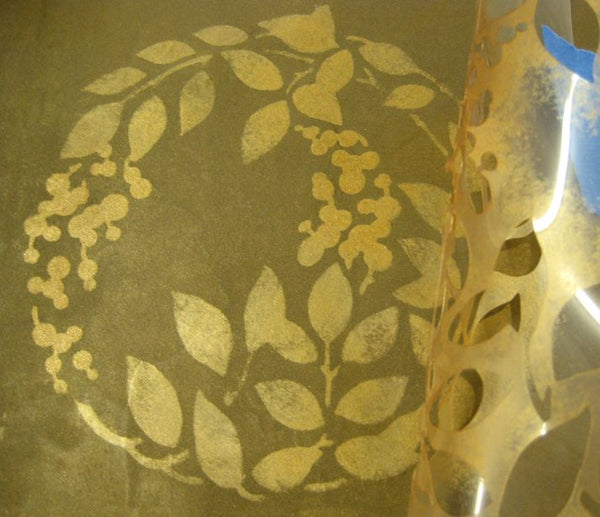
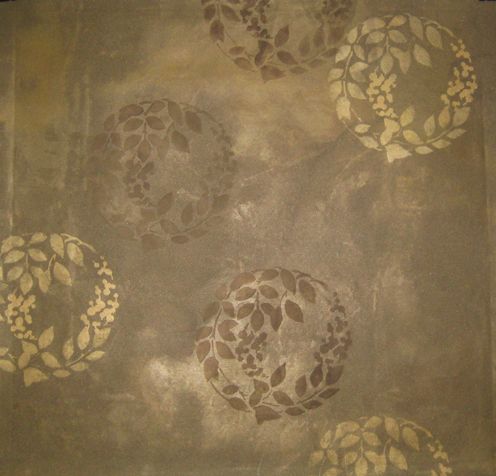
Quick view Magnolia Vine Stencil Size SmallTake advantage of our overstock inventory! Save some cash and stock up! Supplies are limited and all sales are final. This beautiful vine stencil Magnolia Vine is one of our Japanese Mon inspired stencil designs. Graceful floral and animal designs like these were used as family crests ( or mons) in ancient Japan. They could be found on furniture, textiles and various household objects. Now you can beautify your walls, floors, pillows and even t-shirts with these elegant stencil designs. Perfect for DIY decor. Great for allover wallpaper look, or stenciled as a single ornament in a key space, or repeated as a vertical stripe. Use just this design in one size, or add another one from the series and mix them up. Be creative and experiment, it's so much fun!This stencil is so easy to use, virtually anyone can do it. Simply tape it to the wall using BLUE painter's tape, (or secure it with spray adhesive), then load your dense foam roller with a paint of your choice (latex or acrylic). Offload the excess paint on a folded paper towel, make sure there is no excess paint. Then, just roll over the stencil applying light to medium pressure for an instant fabulous result! Don't press on the roller too hard otherwise you might get some bleed. Use a separate roller for each color. Want to learn the easiest stenciling technique? Here are the detailed illustrated Roller Stenciling Tips.If you prefer shaded multi-color look, use stencil brushes ( one per each color) instead of a roller to create beautiful soft shading.We find that it is not necessary to use spray adhesive with our stencils, however if you want very crisp edges or are using high contrasting colors, please use it (Elmer's spray adhesive seems to be the best). On the pictures above I didn't use spray adhesive and still got nice and crisp edges. The trick with stenciling is to take care not to over-load your roller or brush with paint and not to press too hard on a roller while stenciling. I personally prefer just to use blue painter's tape to secure the stencil, but for beginners I would recommend using spray adhesive just to make sure you get great results.When stenciling on fabric, stencil adhesive is very helpful. First, tape your fabric to the surface so it doesn't have any wrinkles or move around while you stencil. Use stencil brushes, or dense foam roller, and add some textile medium ( sold in craft stores) to your acrylics. You can also get a special fabric paint, but, frankly, good craft acrylics with a dollop of medium work just as well, IMO, and cost much less too! Use very little paint while stenciling. Let the finished stenciled image dry completely, 24 hours is best, then heat-set it by ironing the fabric for about 20 sec. ( more or less) on a low setting through the piece of cloth. Heat-setting will cure the paint and will prevent it from being washed off in the washing machine. Always experiment with a sample of your fabric first to ensure good results. I've stenciled on silk, cotton, linen and even sheer fabrics with great results. It's always better if your fabric doesn't have too much texture.The stencil is made out of durable 12 mil clear plastic stencil material. This material is strong but flexible, reusable and easy to clean. We love it so much more than standard 5-8 mil Mylar! It's not brittle, user friendly and just so easy to work with, you'll love the way it "hugs" the wall surface! In our many years of professional stenciling this material has proven to be far superior than any other stencil material we used. Our customers love it too, and we are sure that you'll notice the difference. Our stencils will last a long time and are a pleasure to use.Vendor: Cutting Edge Stencils$1.00 $1.00


